For the MultiTrack and EasyTrack editors, there are multiple tracks available. This is the reason why the Ducking function has its own dialog box.
In order to to duck one or more tracks, you can proceed as follows:
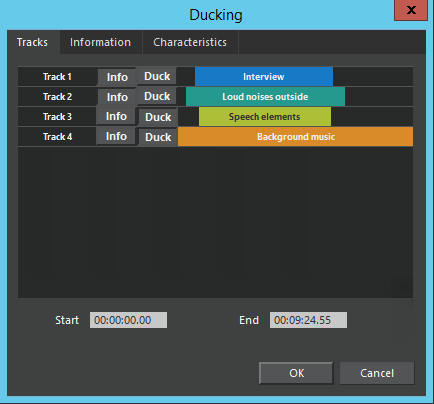
Click the menu Options –> Ducking... and the Ducking dialog box appears:
If you want one track to be predominant (the Info track) but others be faded (the Duck tracks), then click on a track's Info button and on Duck buttons, respectively. Pressed buttons will move slightly right-down, indicating a track's selection. When playing, Duck tracks will be temporarily reduced in volume where audio objects reside on Info tracks. Please note: More than one track can be selected as Info track. Above screenshot shows Track 1 and Track 2 selected as Info tracks and Track 3 and Track 4 as Duck tracks.
If you do not want to apply a ducking to the whole project, then define the area for which you want to apply the ducking by left- and right-clicking in the track section. If you want to duck the whole project, no area needs to be selected.
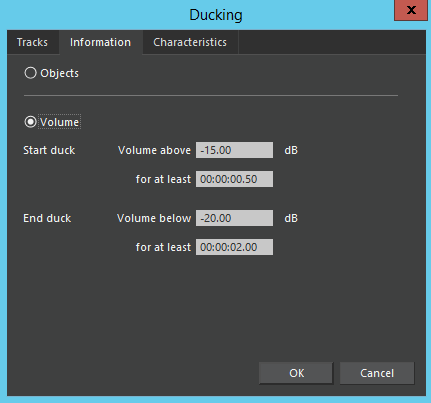
If you want to use the info objects as control information for the ducking fades, click Objects in the Information tab. This way, pauses within audio objects of the Info tracks have no effect:
Alternatively,
if you want to use the audio data of info objects for controlling a ducking fade, click Volume in the Information tab. Then the fade works dependent on the info objects' volume. Fading will only be applied when the volume (of info objects) is above a certain level (Volume above) for longer than x sec (for at least). The process of using Option –> Objects is usually faster. However, when using the Option –> Volume, empty areas within the objects will be taken into account, and at these positions, the duck tracks will not be faded.
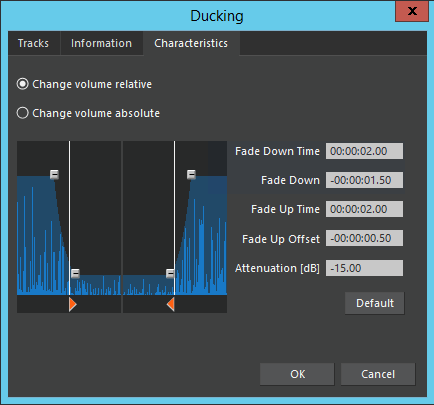
To define the fading curve, drag the fading buttons horizontally:
If you want to change the fading volume, right-click one of the fading buttons in the middle of the curve: The icon changes from horizontalto vertical , so that the button may be moved vertically. Alternatively, time and volume entries may be done via numeric input.
JavaScript errors detected
Please note, these errors can depend on your browser setup.
If this problem persists, please contact our support.