Exporting and Importing Entries
Items stored in a table can be exported and imported.
Export Drag&Drop Entry
- Drag the file(s) with the left mouse button from the table into the destination application (Windows Explorer, MS Outlook etc.). The entry will be exported in a copy process, i.e. the database entry stays in the DigaSystem table.
- Drag the file(s) with the right mouse button from the table into the destination application (e.g. Windows Explorer). All files being part of that entry will be placed at the destination location (normally at least the media file and the referring DBX file). Select the desired action.

Export Entry dialog
- Mark the entries you wish to export and
- Select Export... from the main menu or from the context menu.
Note: Alternatively, you can assign a key combination like Alt+E to the "Export entry" function, and use the key combination here. - Select the desired options from the following Export options box.
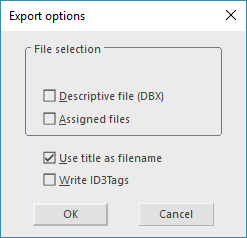
Media file | Exports the main media file |
Descriptive file (DBX) | Exports the DBE/DBX backup file of that entry |
Assigned files | Exports all assigned entry files besides the main media file |
Use title as filename | Recommended: The created file will be named after the entry title (otherwise the file name will be the unique ID of the entry) |
Write ID3Tags | Writes existing ID3 tags into the resulting file(s) |
Finally, select the directory, enter file name, and press "Save".
Export as Entry
The "Export as Entry" function exports a database entry with all related files into a single file in the file system with the extension ".entry".
To trigger this function:
- Select one or several database entries.
- Press the right mouse button while the mouse is over a selected entry.
- Click "Export as entry..." from the pop-up menu
or
Click in the main menu on "Entry" and click on "Export as Entry..." in the opened drop-down menu. - When exporting a single entry, you can specify the destination directory and file name in a "file save as" dialog.
When exporting several entries, you can only specify the destination directory; file names are generated from entry names.
Import Drag&Drop Entry
- Simply drag and drop the *.entry file onto the entry area or use the menu (Entry → Import files).
- The file will be uploaded and added as a new entry to the currently selected table.
Please c.f. for more details in section "Simple Create (Drag and Drop)" in section Creating an Entry
You can also drop onto the group area, for adding the dropped file directly to the opened group.