Individual Entries are located inside Tables, following a database structure. For information on searching, sorting and filtering entries, please see the Finding Entries section.
Tables are created by administrators. They define which users have the rights to access, write and delete tables.
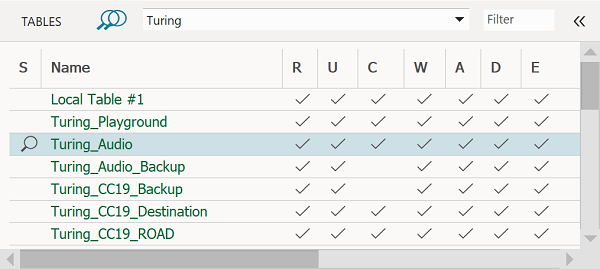
All available tables are listed in the TABLES list. The table whose entries are currently displayed in the ENTRIES area is highlighted.
The TABLES list shows the columns:
S
selected for Multi-Table-Search
Table
Physical (real) table name
Name
Table name
Server
Corresponding database name
R(ead)
User right: Read table content
U(se)
User right: Open entry content
C(reate)
User right: Create entries
W(rite)
User right: Edit entries
A(lign)
User right: Align tables*
D(elete)
User right: Soft delete entries
E(rase)
User right: Erase entries
* "Align tables" means read out mobile tables (e.g. stored on removable devices such as USB sticks). When reconnected the rights allow the user to actualise the content display.
Re-arrange Table Columns
You can simply change the layout of the TABLES area to fit your needs for a better overview:
Re-arrange TABLES columns by dragging a column title to its desired position, or
Change the width of a column by dragging the separator between two column titles.
Selecting Tables
Click on a table to view its entries and use the arrow keys to navigate between tables.
When launching DBM a "startup table" is usually displayed/selected (which has been set by your administrator):
You may define the startup table in the menu Program→Settings in the View tab (also c.f. Settings Dialog Tab: View).
If the table name has a blue font, then you are not connected to this table's database:
Click on it to establish a connection; the table font will then turn green (along with all other tables of this database).
To disconnect a table (usually not necessary) make a right click on the table and choose "Disconnect".
Only a single table can be opened at a time.
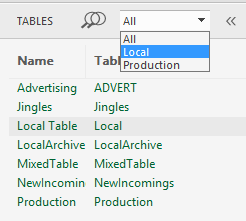
Selecting a Table Group
Table Groups are used to filter tables. If one or more Table Groups have been configured by the Administrator, a drop-down menu appears showing the available Table Groups. In addition, a generic "All" group allows you to access all tables which are available to you.
To display only tables from a certain table group: Select the table group from the drop down menu (e.g. "Local" in the screenshot below).
Filtering for Tables
With the filter field, you can display only those tables, whose name contains the filter term ("Local" in the screenshot below). The filter is applied immediately while you type, and works case-insensitive. To clear the filter, just clear the filter field.
Multi-Table-Search
Clicking on the Multi-Table search button lets you search tables as a group (Despite only one table can be selected at a time).
The S(election) column appears showing a search flag/button for tables selected for multi-table search. The search flag/button is a toggle.
Disconnects from the current table in the database.
Edit Definitions
Opens a dialog where the values of entry mask fields can be edited, deleted or created (equivalent to menu option Database - Edit Definitions c.f. The Menu Bar)
Selection
Activates the table for the Multi-Table-Search (after having clicked on the Multi-Table search button )
As a result, the search flag/button is shown in the S(election) column and the "v" flag is shown at the context menu's Selection option.
This command is equivalent to clicking the space for the flag/button in the "S" column, c.f. Multi-Table-Search above.
JavaScript errors detected
Please note, these errors can depend on your browser setup.
If this problem persists, please contact our support.