Loudness in Clipboard
Any audio entry/file being loaded into the clipboard – this includes newly created takes/clips in the editor – will be checked for loudness data. If there are none, the editor automatically calculates the loudness data, which results in an Ear icon displayed in the field between the item info and the delete button. The ear color indicates the loudness state (see below).
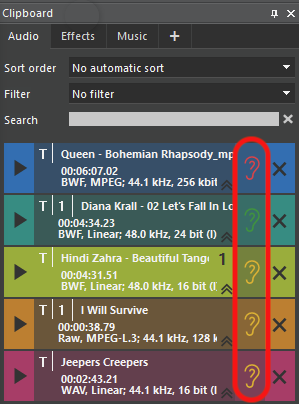
If the file/entry already has been calculated, the ear is displayed according to this data.
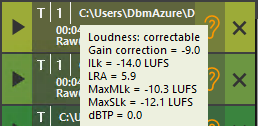
Hover over the ear icon to show the detailed loudness data in a tooltip.
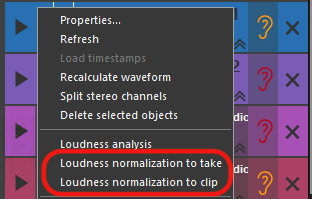
When complex clips (clips, that are made of multiple audio objects) are created during playback or recording, they cannot be loudness analyzed. This will be stated in the appearing Create Clip dialog. Such items have to be analyzed manually via the option Loudness Analysis in the clipboard item’s context menu.
Loudness Ears
The Loudness Ears are displayed in three main colors (that are configurable, here the default values are shown):
| Compliant | This audio file matches the defined Loudness criteria, therefore it is loudness compliant. |
| Correctable | This audio does not match the defined Loudness criteria, but can be corrected to the “Compliant” status by Loudness normalization (see below). |
| Not Correctable | This audio differs to the specified Loudness criteria in a way that cannot be corrected by a simple normalization. |
| Invalid Data | This icon is shown if the audio file contains inconsistent loudness data. |


Loudness Normalization
Any audio element in the clipboard can be normalized to loudness terms. This option is available for takes and clips and will perform a loudness analysis in case the element does not have loudness data yet. As a result, a new take/clip will be created for each object that goes through this process. The original file(s) will not be changed (non-destructive processing).
In the clipboard, open the context menu of one or several selected audio items. Choose Loudness normalization to take or Loudness normalization to clip depending on which type of item you want to get in the result.
Accelerators can be assigned to both functions in the editor settings. They work if at least one audio item in the clipboard is selected.
The normalizer will always try to optimize the audio, which means, if the item has to be analyzed first and it turns out to be Not Correctable it will - if possible - perform a normalization anyway to bring the audio closer to loudness terms.
The progress dialog displays the current normalization status and informs about special events during the process, e.g. reasons for not normalizing certain objects:

If there is nothing to report, the dialog closes automatically after finishing the normalization tasks.
If the normalization result would be identical to the original values, no new file will be created.
All Loudness data are saved into projects with the according files.
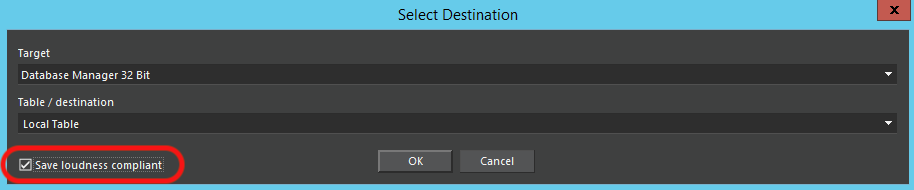
Loudness Compliant Saving
When saving audio to DBM or file system, a check box appears in the Select Destination dialog. If checked, the editor will try to create a loudness compliant audio while saving.
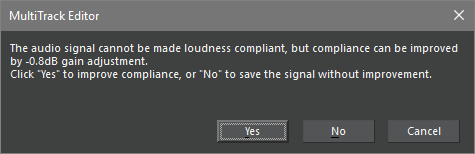
If the audio is “not correctable” the normalization will be done as close as possible to the “compliant” state. A message informs about the suggested volume adjustment.