DigAIRange has a number of configurable parameters. Users are allowed to change several of these parameters, but others may only be accessed for system administrators or superusers. Since rights are issued on an individual user basis, this section describes all the available parameters.
Opening the Settings
-
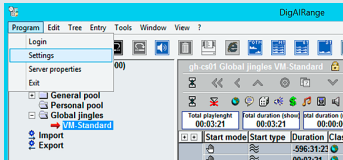
Click the [Program] tab,
-
and then click [Settings].
-
The "Settings" dialog box opens.
From here, you can access all the tabs.
"View" Tab
|
Load / Save fonts |
All fonts are loaded from the User Registry or saved there. |
|
Load /Save toolbar |
The toolbar settings are loaded from the User Registry or saved there. |
|
Use alternative toolbar icons |
Alternative toolbar icons. |
|
Floating department filter |
The department filter is displayed in a floating frame which is permanently visible. |
|
Maximize on activation |
When you switch to DigAIRange, the window is maximized automatically. |
|
Free teamlist |
The team list can be freely configured (without any predefined fields). |
|
Reset filter when loading new list |
When a new show list is loaded, the filter is reset and all the entries are displayed. |
|
Two upper show windows |
Activates two show windows displayed next to each other. |
|
Background bitmap |
Displays a bitmap in the window background. |
|
Background for selected filter |
The active filter of the background color. |
|
Fonts |
Select the fonts in the Selection tree and in the title bars of the upper and lower windows. |
Note: The self-explanatory functions are not described here.
"Mask" Tab
|
Shown tabs / submasks |
Activated selection is displayed as a submask in the entry mask. Note: All the tabs are described in the section Windows Areas. |
|
First shown tab |
Defines the tab shown by default after you open an entry. |
|
Position |
Defines the position of the data mask, either "In lower right window" (multiview window), or "As modal dialog" (floating frame), or "Automatically depending on window size" (best alternative, depending on the size of the multiview window). |
|
Options |
If the "When new line in show list is selected set input focus to mask" checkbox is activated, the cursor is always positioned automatically in the first field of a dialog field when it opens, after you select an entry in the broadcast table window. If the "Autosave" checkbox is activated, changes to a mask are saved without confirmation when you exit a mask. If the "Check fixed times before saving" checkbox is activated, the time settings for fixed/variable times are verified before the area mask is finally saved. If the position of a group or element is not permitted, a dialog box opens, indicating the position. |
"List View" Tab
|
Options |
In the "Grid type" dropdown list, select the display of table lines in list views (without lines, with lines, gray 3D lines).
In the "Hierarchy lines" dropdown list, select the type of lines (without lines, black line, gray dotted lines).
In the "Tolerance for gaps [ms]" field, specify a time threshold in milliseconds (ms) until which gaps are not displayed as such.
If the "Display groups in sorted lists" checkbox is activated, group headers are hidden in unsorted lists.
If the "Display status "NoFile" like "Missing"" checkbox is activated, the "Missing" state is displayed when an audio file is not listed.
In the "Line spacing (top/bottom)" field, specify the line spacing in pixels. |
|
Background colors |
If a list is activated by a tick, you can change the background color of the list. |
|
Elements, Stories, Groups |
If the "Text" or "Background" checkbox is activated, you can change the text or background color, and the font of each element. |
|
Group separation |
Specifies the spacing between two groups in pixels. |
|
Info preview |
If the "Text" or "Background" checkbox is activated, you can change the text or background color, and the font of each element. |
|
Show info line before entry |
When this option is activated, info lines are displayed above the associated entry. |
|
Indent info lines |
Specifies the size of the indent in pixels. |
"List View 2" Tab
|
Open groups with this class |
If a group is activated by a tick, this group is displayed open in the broadcast table window. |
|
Title bar |
Changes the background color of title bars and the focus color when particular elements are activated. |
|
DragDrop options |
If the "Text" or "Background" checkbox is activated, you can change the text or background color, and the font of each element. |
|
|
If the "Drag&drop always to end of group" checkbox is activated, new entries pasted are always placed at the end of each group.
If the "Disintegrate dropped groups" checkbox is activated, groups are disintegrated after they are moved.
If the "Drop of groups without elements" checkbox is activated, empty groups cannot be moved.
If the "Disallow insertion of grouping nodes if it..." checkbox is activated, a grouping node cannot be moved to another group or story.
If the "Automatic offset correction for..." checkbox is activated, offsets are adapted when you move groups.
If the "Set wrongly place elements/groups..." checkbox is activated, elements with start on time are set to manual. This prevents them from starting at the wrong time. |
|
Time until group/story is automatically opened |
Specify the time in seconds after which a group is opened in the broadcast table window. |
|
SyncView settings |
Opens the "Settings for synchronized list view" dialog box. |
User Columns Tab
Add user-defined columns here. If you need a detailed description, please refer to the BCSTechManual.
"Columns 1" Tab
|
Show |
If a field is activated by a tick, the column name is displayed in the title bar of the show in the broadcast table window. |
|
Day trash |
If a field is activated by a tick, the column name is displayed in the title bar of the day trash in the broadcast table window. |
|
Column settings |
Select from a range of different load and save options after you edit the column display. |
|
Column arrangement |
If the "Free" radio button is activated, you can drag&drop columns together in the broadcast table window. If the "Fix" radio button is activated, you cannot drag&drop columns in the broadcast table window. |
|
Short intro/outro times |
If one or the two fields are activated by a tick, the intro and/outro time is displayed is the appropriate format. |
"Columns 2" Tab
|
Pool (with time adjustment) |
If a field is activated by a tick, the name of the column is displayed in the title bar of the pool in the broadcast table window. |
Note: For every pool type (general pool, personal pool, jungle groups, preproductions, day and show preschedules), you can set a flag to disable time calculations in the pool using [Manage] in the administrator window. If you deactivate time calculation, you can sort the list in DigAIRange by clicking on the column header.
"Colors" Tab
Only the administrator can view the "Colors" tab.
|
Class - Color |
A separate color can be assigned to each entry class to sort an entry immediately. When you click on a color field, the color selection field opens. |
|
Save values to global registry |
If this field is activated by a tick, the colors are saved for global use. |
|
Delete values in local registry |
If this field is activated by a tick, the local settings are selected and global color settings are always loaded. |
"Key Shortcuts" Tab
|
Context |
Shows the window in which the command occurs. |
|
Command |
The command which is assigned to a key shortcut. |
|
Key shortcut |
Click on the required line and then hold down the required key shortcut. The key shortcut is then displayed and is immediately active when you exit the dialog. |
|
Source |
Shows the source of the key shortcut. |
|
Read settings from |
Select the registry for read-out. |
|
Allow pure special keys (like cursor or return) |
If this field is activated by a tick, you can also use special keys for key shortcuts. |
|
Standard |
Resets the entry for the key shortcut of a selected line back to the default value. |
|
Empty |
Deletes the entry for the key shortcut of a selected line. |
"OnAIR TrackMixer" Tab
|
Display |
If the field is activated by a tick, the highlighting is displayed in the OnAIR TrackMixer. Note: OnAIR TrackMixer requires the MultiRec 4 audio recorder. You can select this from the "Local" tab. |
|
OCX-Control |
Select the CrossfadeMixer (old) or the OnAIR TrackMixer. |
|
Settings |
Outputs the standard zoom range and voice tracking fade-out playtime in seconds.
Select various channel options for the "Display of waveform".
Select manual or sequential "Start mode for new elements".
Activate or deactivate settings for mode, editing, highlights, view, and saving. |
|
Auto duck parameters |
Specify offset and time values in milliseconds, and attenuation in decibels. |
|
XAML file for OTM |
Select an XAML file to display an optional user interface (GUI). |
"Local" Tab
Only the administrator can view the "Local" tab.
|
Multi-Recorder / Soundcard |
Select the audio engine.
|
|
Soundcard (out) / Soundcard (in) |
Select the sound card which the DigAIRange will use.
|
|
Fader |
Select the required fader ID. |
|
Videocard |
Select the video card which the DigAIRange will use. |
|
Skin-File |
Select a skin file to display an alternative user interface (GUI) for the player/recorder in DigAIRange. |
|
Skin in CFM/OTM |
Select an XAML file to display an alternative user interface (GUI) for the CrossfadeMixer or OnAIR TrackMixer. |
|
Default fader level |
Preset the position of the listening volume control. |
|
Show MultiRec in modal mask |
Activates the audio preview dialog in the floating window of the entry mask. |
|
Auto Login |
Set the local parameters for the AutoLogin here. |
"Tree" Tab
|
Visible keys in the tree |
If a key is activated by a tick in the "Visible" field, the key is displayed in the selection tree. |
|
Primary Server |
If several BroadcastServers are used, define here which is connected automatically to the DigAIRange when started. |
|
Primary Service |
Select the program / channel to which DigAIRange connects automatically. |
|
Hierarchy lines |
Select how the lines should look like, |
|
Double-click on a rundown item |
Defines the action when you double-click on a show node. It either opens the node or loads the node in the upper show window. |
|
Show title tips in tree |
If this field is activated by a tick, tooltips are displayed when the structure tree window setting is too narrow to display the full title. |
|
Daypool first |
If the field is activated by a tick, the day pool preschedule is displayed at the top of the day list. |
|
Available views in left window |
If the "Classical tree view" checkbox is ticked, or if the two checkboxes are ticked, the tree structure is loaded. If the "Simple dialog view" checkbox is activated, only the dialog view is loaded. |