Configuration for Starting a Workflow for an Entry
All configuration must be defined in the Digas Admin tool or via the DPE Management Services.
The configuration can be spread across USER, LOCAL and GLOBAL registries.
Any parameters set in USER will take precedence over LOCAL and GLOBAL. Parameters in LOCAL will take precedence over GLOBAL.
Connecting to DpeWebServices
For enabling Database Manager connecting to the right DpeWebServices following configuration setting is needed
Parameter | Comment |
|---|---|
| | Common | DpeServiceRoot | Defines the base URI of the DPE system used from all DigaSystem applications The protocol, unless explicitly specified, defaults to " Example: |
| | DBM | DpeServiceRoot | This parameter allows to override above common setting specifically for DBM. |
You must configure on of theses parameters in order to use workflows. If the parameter is not configured or configured as empty, workflows will be unavailable.
Configuring Workflows
Workflow configuration shares many properties with DBM custom action configuration, and with menu configuration in DPE. In fact, DBM workflows are a special case of DBM custom actions. Please also refer to the Configuring Custom Actions section.
Workflows and custom actions are configured under | DBM | Actions | ... . Create a folder with unique, meaningful name for each workflow. The name itself is not used by the software. When you distribute the configuration values of one workflow across registries (User, Local, Global), then all folders for one workflow must have the same name.
Create the configuration keys for the workflow inside this sub-folder, e.g. | DBM | Actions | WorkflowName |
Parameter | Comment |
|---|---|
Action ApplySymbolColor | These entries are described in detail on the page Configuring Custom Actions under the heading "Common Configuration". Note that Action must have the value Workflow. |
| Config | Defines the workflow that should be triggered. The configuration can have one of the forms described in the following sections. a) Contains either directly the name of the workflow template or b) A JSON configuration specifying the workflow template used and the up-front dialog configuration (see below) In both cases, desired workflow templates have to be imported into the Workflow system, before the templates can be used. |
Config for Workflows with zero or more arguments and with optional up-front dialog
For workflows that operate on the selected file, but which require additional arguments, you must place a JSON structure into the Config parameter which describes the workflow and its parameters.
Key | Description |
|---|---|
Headline | The title of the dialog that prompts for interactive input of runtime parameters, if any. If you leave this parameter empty or undefined, the workflow name will be put into the dialog title. |
Workflow | The name of the workflow template which is to be executed. |
Arguments | Arguments are used to assign values required by a workflow via a user dialog. They are listed in key/value pairs like "Key1": "Value1", "Key2": {"SubKey2": "SubValue 2"} In the example below, the key “mailto” has value definition { "label": "To", "input": "text", "value": "david" }
For input = "textarea":
For input = "select":
Note only one of
For input = "table-select": Select a table from dynamically filled drop-down menu
For input = "entry-select": Select an entry from dynamically filled drop-down menu
|
VisibleForClasses | This optional parameter allows to define for which entry classes a workflow is available. It contains an array of class names. Accepted class names are: None, News, Text, Music, Cart, Commercial, Control, Command, Graphic, Video, Project, Audio, Story, Magazine, Promotion, Live, Line, Info, VideoProject, SequoiaProject, BatchList, Zip-Archiv, DigaCutMT-Project, Unknown, DigaCutST-Project. |
MultiSelection | Workflows are normally not available when more than one table entry is selected. The "MultiSelection" value, when set to "1", defines that this workflow should also be available for multiple selected entries. When set to "0", the workflow name in the menu is displayed in grey and cannot be selected in this situation. The default value is "0". |
ManyToOne | optional; new since version 5.8.8209.0. Only used if MultiSelection=1. If this parameter is set to 0 (the default value), and multiple entries are selected, a separate instance of the workflow is created for each selected entry. When ManyToOne=1 is configured, a single workflow instance is created which received all selected entries. Please consult the workflow documentation for details. |
| AlwaysDisplayDialog optional; new since version 5.10.8262.0 | This parameter is only relevant for workflows which have no arguments. When set to 1, DBM displays a confirmation dialog every time you launch the workflow. Its default value is 0, which means that an argument-less workflow starts immediately when you click the related button or elect it from a menu. |
Example: Basic Dialog
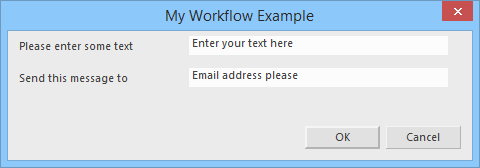
Creating a user dialog before starting 'ExampleWorkflow'.
{
  "Workflow": "ExampleWorkflow",
  "Headline": "My Workflow Example",
  "MultiSelection": "True",
  "Arguments":
  {
    "FixedString": "A fixed string value",
    "TextInput":
    {
      "label": "Please enter some text",
      "input": "text",
      "value": "Enter your text here"
    },
    "EmailField":
    {
      "label": "Send this message to",
      "input": "email",
      "value": "Email address please"
    },
  }
}
Whitespace, including line breaks, is purely decorative and can freely be inserted for better readability.
The dialog created by this configuration looks like this:

Example: Dialog with a static Drop-Down Menu
Configure a workflow with four arguments and with a user dialog containing a drop-down
{
  "Workflow": "workflow_name",
  "Arguments":
  {
    "argument_1": "value_1",
    "argument_2":
    {
      "label": "TextInput",
      "input": "text"
    },
    "argument_3":
    {
      "label": "EmailField",
      "input": "email"
    },
    "argument_4":
    {
      "input": "select",
	  "label": "ComboSelect"
      "options":
      [
        {"text": "first", "value": "1"},
        {"text": "second", "value": "2"},
        {"text": "third", "value": "3"}
      ],
      "value": "2"
    }
  }
}
This Config data creates a workflow with the name "workflow_name" that takes 4 arguments.
- The argument arguments_1 receives the value value_1
- The arguments arguments_2 and argument_3 must be entered by the user in a dialog that pops up when the workflow is triggered. The input field is labeled "TextInput" and "EmailField"
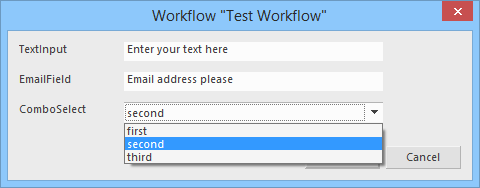
- For argument_4, the dialog contains a combo box with a drop-down field which lets the user choose among "first", "second", and "third" option.
Depending on which entry is selected by the user, the value "1", "2", or "3" is sent to the workflow.
The combo box is labelled as "ComboSelect"
"second" is initially selected because this is the text that corresponds to the configured default value "2".
Example: Dialog containing table selection
Select from a list of available tables for which the user has sufficient rights.
{
  "Headline": "Which table should the entry be copied to?",
  "Workflow": "CopyEntrySpecial",
  "Arguments":
  {
    "TargetTableId": { "label": "Send to table",  "input": "table-select", "value": "MyDatabase\\MyTable", "rights": [ "Create", "SoftDelete" ] }
  }
}
This configuration produces the following dialog:

When you click the down-arrow, you see a list of tables for which you have "Create" and "SoftDelete" rights.
Example: Dialog containing entry selection
Select from a list of available entries.
{
  "Workflow": "Test",
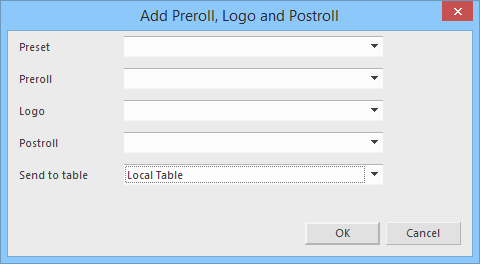
  "Headline": "Add Preroll, Logo and Postroll",
  "Arguments":
  {
    "Preset":
    {
      "input": "entry-select",
      "value": "",
      "tableId": "Vm-Sql-Digas\\GaliLeo_watermark",
      "xmlFilter": "<XmlFilter><And><Field Name=\"Story\" >2<\/Field><Field Name=\"SoftDeleted\">0<\/Field><\/And><\/XmlFilter>"
    },
    "Preroll":
    {
      "input": "entry-select",
      "value": "",
      "tableId": "Vm-Sql-Digas\\GaliLeo_watermark",
      "xmlFilter": "<XmlFilter><And><Field Name=\"Informat\" Like=\"1\">Pre%<\/Field><Field Name=\"SoftDeleted\">0<\/Field><\/And><\/XmlFilter>"
    },
    "Logo":
    {
      "input": "entry-select",
      "value": "",
      "tableId": "Vm-Sql-Digas\\GaliLeo_watermark",
      "xmlFilter": "<XmlFilter><And><Field Name=\"Informat\" Like=\"1\">Logo%<\/Field><Field Name=\"SoftDeleted\">0<\/Field><\/And><\/XmlFilter>"
    },
    "Postroll":
    {
      "input": "entry-select",
      "value": "",
      "tableId": "Vm-Sql-Digas\\GaliLeo_watermark",
      "xmlFilter": "<XmlFilter><And><Field Name=\"Informat\" Like=\"1\">Post%<\/Field><Field Name=\"SoftDeleted\">0<\/Field><\/And><\/XmlFilter>"
    },
    "SendToTable": { "label": "Send to table",  "input": "table-select", "value": "Vm-Sql-Digas\\GaliLeo_temp", "rights": [ "Create", "SoftDelete" ] }
  }
}
This is the dialog that is displayed :

Enabling Workflow per User
- You define the workflow in the GLOBAL registry but leave out the Enabled parameter. This hides the workflow from all DBM users. Later, you will enable the workflow for selected users.
- Enable this workflow configuration for specific users by setting USER_PAR | DBM | Workflows | AnyName | Enabled=1 for each user who should be able to see the workflow.
You may have to create intermediate registry folders.
Alternatively:
- Add GLOBAL | DBM | Workflows | AnyName | Enabled=1 to enable the workflow for all users.

