Overview
The “metadata mask” is a dialog window in which you can edit almost any property of an entry in a table. There are four ways to open the metadata mask:
-
Select (e.g. by left mouse click) an entry of the table, then click “Entry” on the main menu, then “Edit” on the drop-down menu.
-
Right-click an entry, then click “Edit” on the pop-up menu.
-
Select an entry, then press the ENTER key.
The items which are displayed in the metadata mask depend on the class of the entry being displayed, on the DBM configuration, and partially on the presence of available external items like Audio Editors. The majority of its operations are available in the sub pages which cover the greater part of the dialog.
The basics of the metadata mask and its sub pages are covered in the “Getting Started” article Editing Entry Metadata. This article describes advanced usage and configuration.
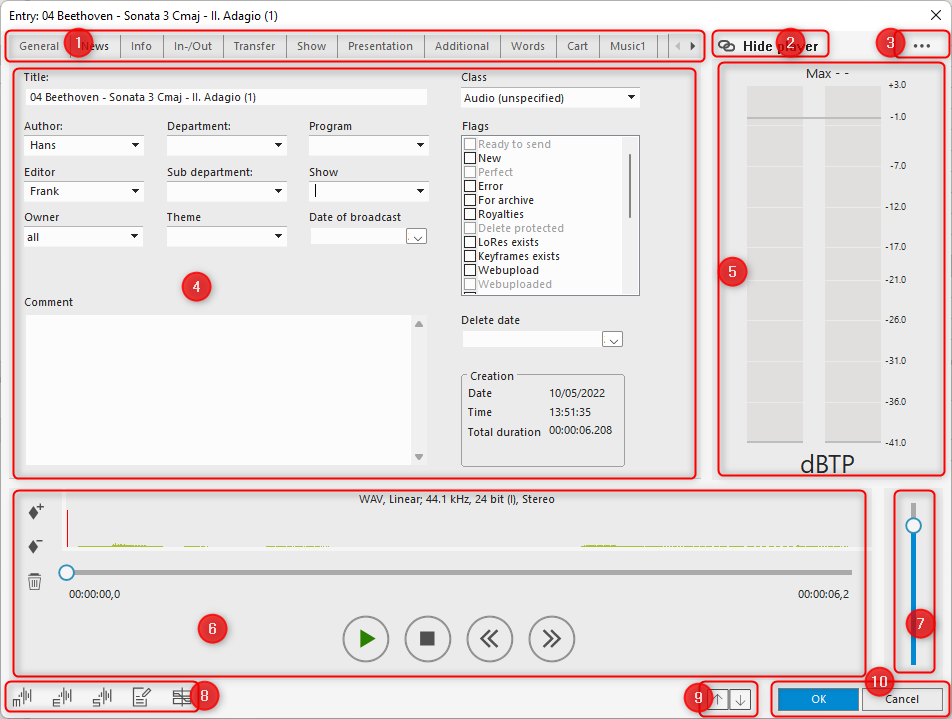
Parts of the Mask
|
1 |
Page tabs. Click a tab to open the related sub page. The selection of initially available pages can be configured, as well as the initially open page, and there is a shortcut to make all pages available. |
|
2 |
Quick action button. Can be configured to execute your favourite action. |
|
3 |
Menu button. Opens a menu from which more actions are available. |
|
4 |
Sub page. This area displays the current sub page. |
|
5 |
The loudness meter is used during playback and recording. Only available if the entry contains audio. You can hide it interactively, and configuration controls whether it is initially displayed. |
|
6 |
The player. You can play or record audio, or play video. Only available if audio or video exists, r audio can be recorded. You can hide it interactively, and configuration controls whether it is initially displayed. |
|
7 |
Gain control. Controls the audio volume during playback. During recording, an additional control for recording volume is displayed. |
|
8 |
Edit buttons. Each button stand for a specific application to which the audio is sent. This works like the “Entry to” items in the “Entry” menu. The buttons are only available if the entry is of a suitable kind. |
|
9 |
Previous/Next buttons. Save current edits and open the previous or next entry in the list. |
|
10 |
Exit buttons. Click “OK” to save edits, or “Cancel” to revoke them. |
Displaying Tabs and Sub Pages
Configuring Tabs and Sub Pages
This task requires that you run the Admin tool. To run Admin, you must know the credentials of the Digas administrator.
In this step you configure which tabs and sub pages are visible when you open the mask for an entry in a table. The configuration is kept for each table individually, and depends on the entry’s class.
-
Launch the Admin tool, and log in with the Digas adminstrator’s credentials. It is not required to run ADmin with Windows elevation (“as admin”).
-
In the tree on the left side, open “ODBC”; double-click the database where the table is located, then navgate to “DigAS-Tables”, open the node for the table in question, and click “Classes”.
-
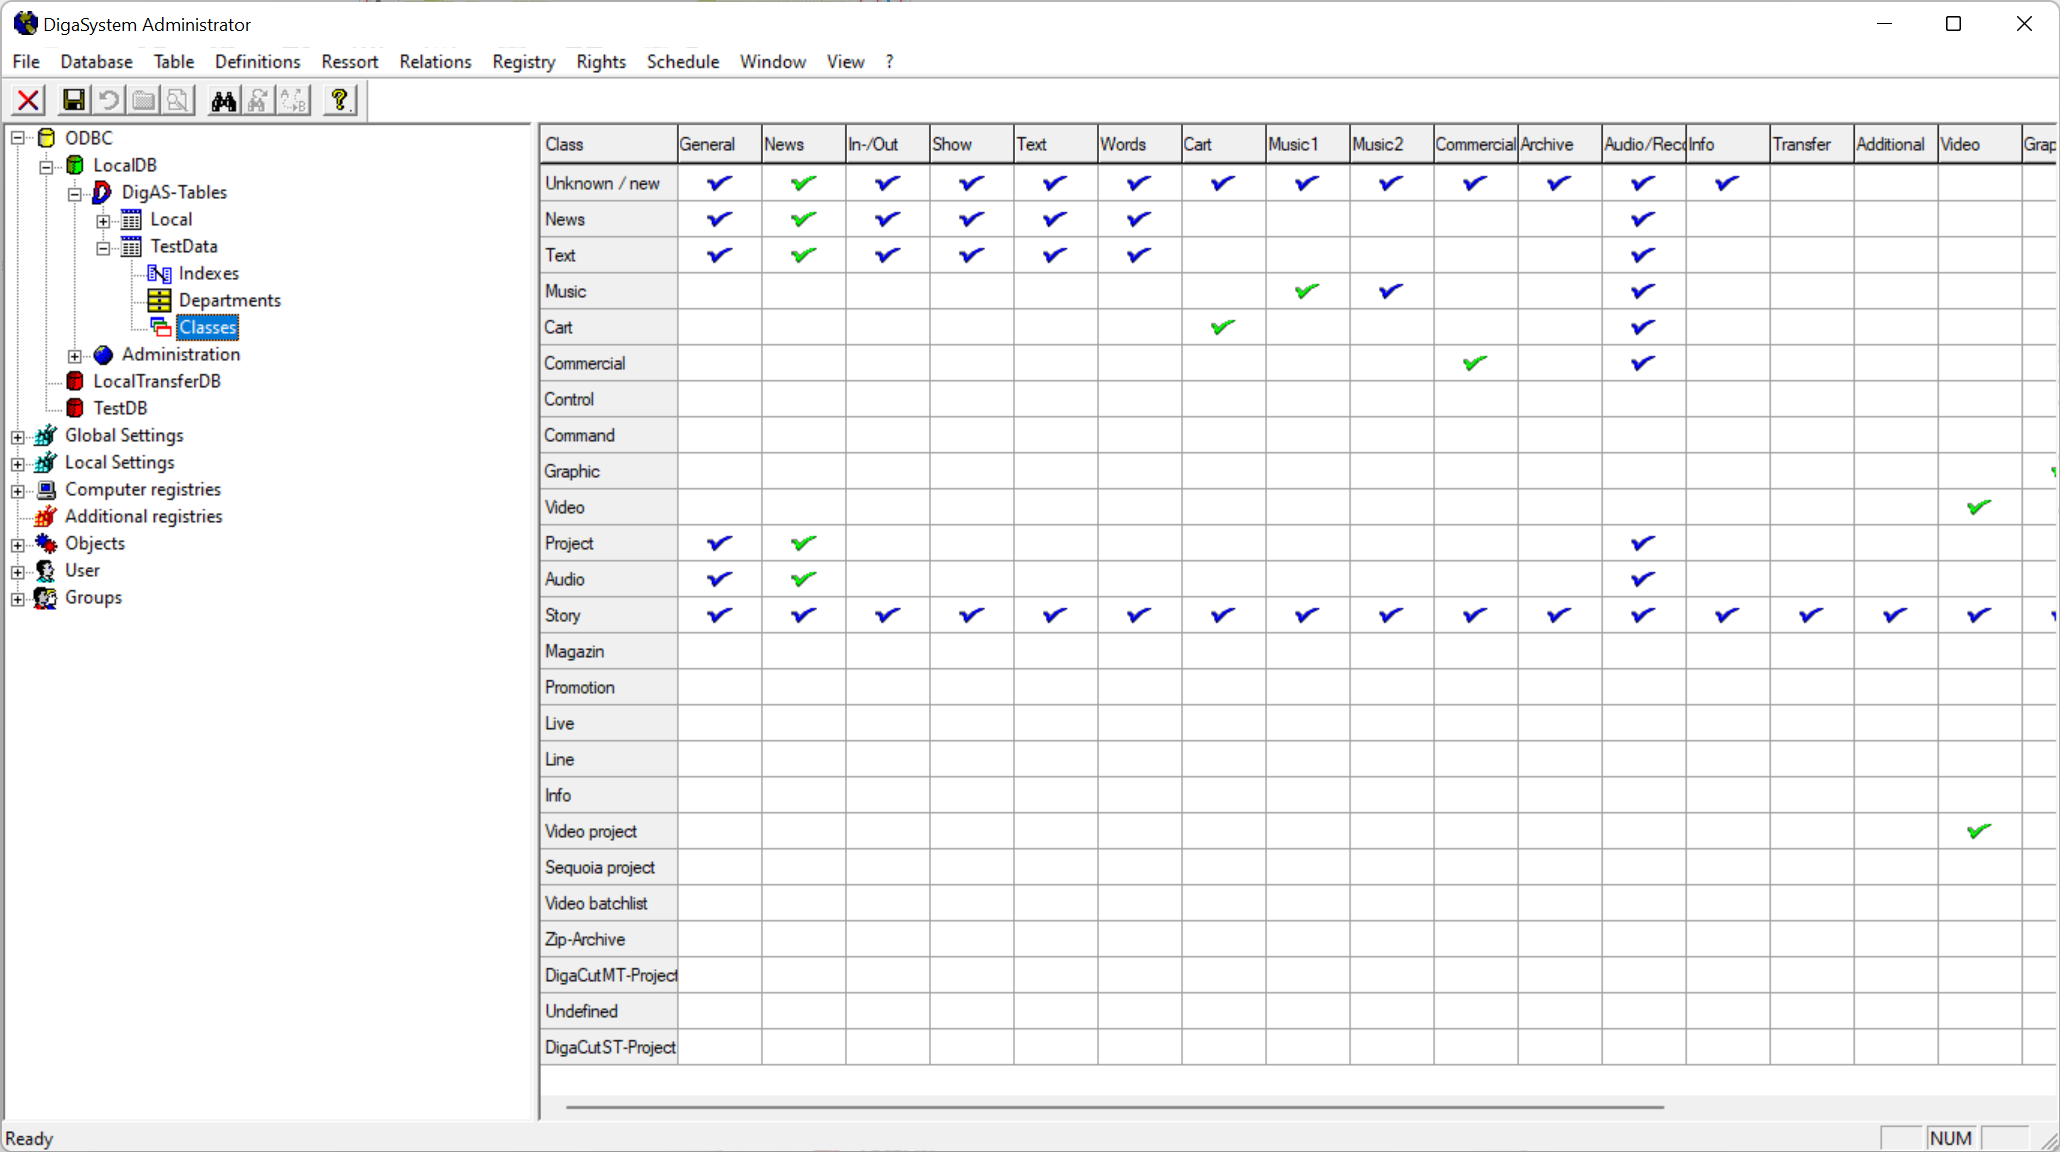
This will display a grid like this on the right part of the Admin UI:
-
Each row corresponds to an entry class; each column corresponds to a tab and a sub page of the mask. The grid may extend beyond the border of the Admin; custom masks (if configured) can be found at its far right end.
-
Use the left mouse button to set or remove a (blue) check mark in a cell to indicate whether or not this tab and sub page should be available when an entry of this class is loaded into the mask.
-
Use the right mouse button to set a green check mark. The green mark indicates that this is the sub page which is initially open when the entry is loaded into the mask. There can be only one green check per row; when you try to set another green check mark, the previously green check turns blue.
-
Under special circumstances, an entry can have ore than one class. In this case, the tabs are the combination of all classes.
Showing all Tabs
Administrators will usually configure DBM so that only those tabs are displayed which are used in day-to-day workflows. However, in rare cases, you may need an additional tab.
The key shortcut “Mask – Show all submasks”, which by default is assigned to Ctrl+Shift+A, makes all tabs visible. If you have sufficient rights, you can reassign this function to a different key. The aditional tabs are removed when you close the mask, or when you use the Previous/Next buttons to load a different entry.
Quick Action Button and the Menu
The “…” menu button displays the following menu:
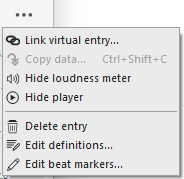
The parameter DBM|MetadataMaskAction can be used to define one of the menu operation to become available through the Quick Action button. The respective entry is then removed from the menu.
|
MetadataMaskAction value |
Item on Quick Action button |
|---|---|
|
CopyData |
Copy data |
|
LoudnessMeter |
Show/Hide loudness meter |
|
Player |
Show/Hide player |
|
EditBeatMarkers |
Edit beat markers |
|
EditDefinitions |
Edit definitions |
|
DeleteEntry |
Delete entry |
|
Sequoia |
(Name of 3rd party audio editor) |
|
none |
The button is removed from the mask |
|
LinkToVirtualEntry, or empty, or none of the above |
Link virtual entry |
The “Sequoia” value in fact calls the configured 3rd party audio editor. The label on the Quick Action button reflects the name of this editor.