Usage Scenarios
The ROAD Interview Recorder allows you to create audio recordings of your online meetings (e.g., Skype, Zoom, Teams, etc.).
This is made possible by a technique called, "loopback recording", which takes output devices, e.g., headphones or speakers, as available sources for a audio recording (i.e., outputs can be used as inputs).
For example, if you are on a Teams call using your headphones to listen to the other participants, whatever you hear in your headphones can be recorded by selecting the according device as the "Guest" audio device (see Audio Devices, below).
This audio is recorded separately from the sound of your own voice, captured by microphone or other input device (as listed in the Sound > Recording settings).
It is possible to select any available input device for your own voice, independently from the input device assigned for use by the meeting application.
Because of its capability to do loopback recordings it's also usable to record any audio which is playing on your computer.
To make the ROAD Interview Recorder be available at any time on demand, it can be made a startup program being active always when Windows is ready.
Installation
Interview Recorder uses ROAD Service as a backend providing access to local audio devices.
Run the ROAD Service setup to install it on the machine where Interview Recorder will run. Note: The MongoDB instance used by ROAD service does not need to be local.
Then install Interview Recorder using its own setup (InterviewRecorderSetup.exe).
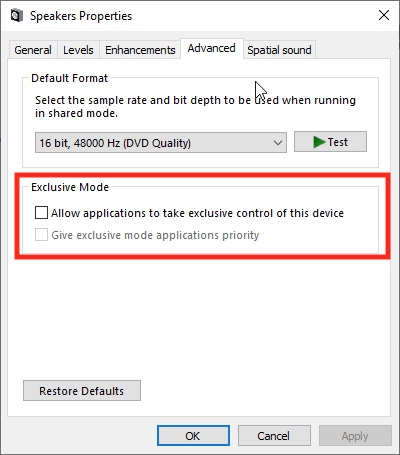
In order to avoid possible conflicts with other audio applications, it is best practice to disable Exclusive Mode for any device that will be used with Interview Recorder.
Starting the Interview Recorder
Run the Interview Recorder from the Windows start menu.

If minimized, the Interview Recorder can also be called up from the Windows system tray (notification area). See Minimized Interview Recorder.
The Interview Recorder comes up with the DPE Logon dialog and prompts you to enter your DigaSystem credentials. DPE URL and user name will reappear the next time the Interview Recorder is started.
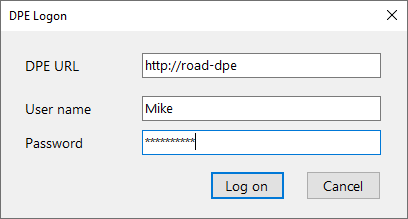
When you press "Log on" your user name and password will be verified with the used DPE service.
Main Screen
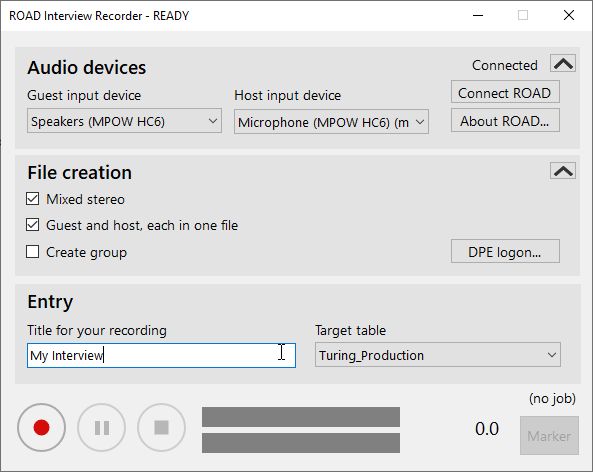
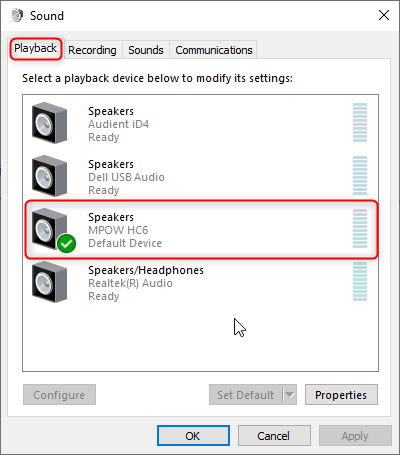
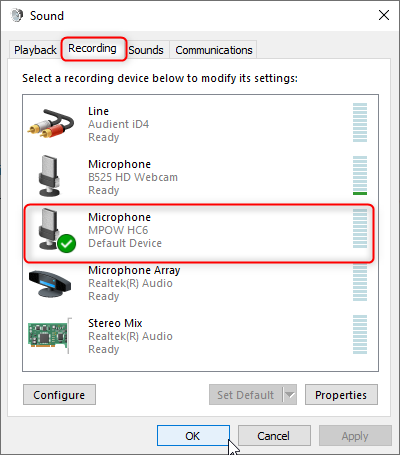
Audio devices
Select each an audio device for
-
Guest side (your counterpart of conversation, so an audio output device like a headphone or speaker)
-
Host side (yourself, so an audio input like a microphone or headset)
Connect ROAD: Use this button to connect to your local ROAD service and retrieve all available devices for guest and host. This is only required if the ROAD connection failed before or if the devices list needs to be updated.
About ROAD: Displays all ROAD components and their version number. As the backend versions are queried from the ROAD service, this allows you also to test the connection status.
File creation
Select which files are created in the DigaSystem database for the recording. Available options are:
-
Mixed stereo: Guest and host side are recorded into one stereo file
-
Guest and host, each in one file: Two audio files are created - one for the guest, one for the host
-
Create group (only available if several outputs are to be created): Create a Digas group containing all audios
You can select both "Mixed stereo" and "Guest and host, each in one file" at the same time. This creates both types of output files.
Target Table: Selection of DigaSystem tables available for the logged on user. The last selection will be remembered for the next session.
DPE Logon...: Change logon information which was entered after program start.
Recording
Entry title: Title of the recording. All created audio entries get a title starting with this text (like "My interview (guest)"). As long as you leave this field empty a default title will be applied. You can edit the title as long as the recording is running.
Rec: Press this button to start a new recording.
Pause / Resume: Press this button to pause a running recording or to resume a paused recording.
Finish: Press this button to finish an active or paused recording.
Marker: Press this button to set a marker to the current time position in the running recording.
Minimized Interview Recorder
By use of the standard Minimize button in the window's caption bar the Interview Recorder window disappears. Then you can see only the Windows task bar icon and the system tray icon.
Status Info of the System Tray Icon
The tray icon shows the current state of the Interview Recorder. By hovering the mouse over it there appears a text information:
|
|
Ready for recording, so you start a recording instantly |
|
|
Recording is active |
|
|
Not ready for recording due to several possible reasons
|


Actions on the System Tray Icon
Left-click the tray icon to show the Interview Recorder.
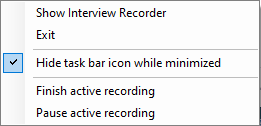
Right-click the tray icon to show its context menu:
-
Show Interview Recorder: Bring the Interview Recorder Window up.
-
Exit: Close the Interview Recorder. If there is an active or paused recording you will be asked for confirmation.
-
Hide taks bar icon while minimized: Select this option to save the space in the Windows task bar. The tray icon remains visible.
-
Start recording: Appears only while there is no recording active.
-
Finish active recording / Finish paused recording: Appears only while a recording is running.
-
Pause active recording / Resume active recording: Appears only while a recording is running / paused.