Window Areas and Elements
In the following image you see a typical window of the MultiTrack screen with its window areas, elements and buttons.
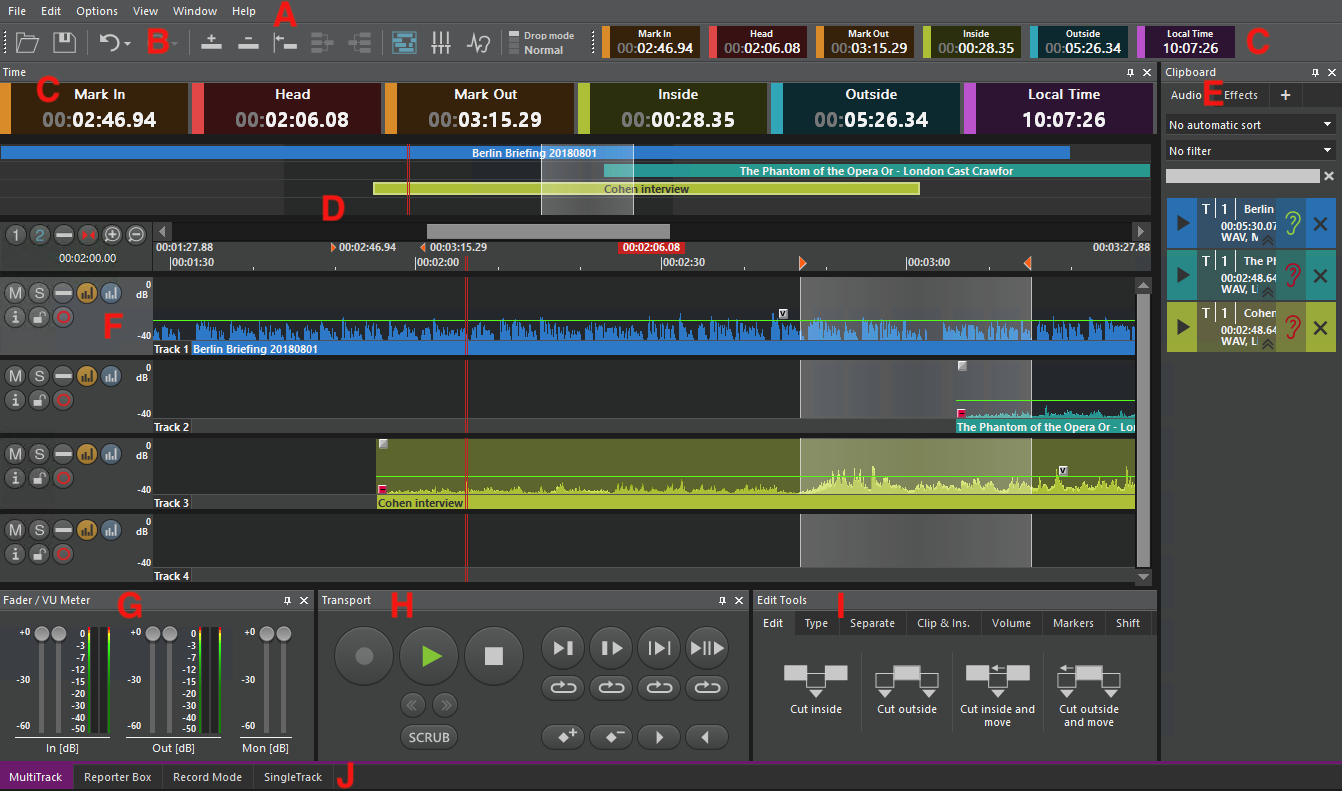
Window elements in the MultiTrack screen.
|
A |
Standard Windows menu to access most commands |
|
|
B |
Toolbar |
Offers buttons for some basic functions; there's a main and additional toolbars |
|
C |
Timebar |
Enlarged Timebar can be added separately. The timebar may be individually labeled with time information for the project, or with real-time statements. C.f. section Timebar in page Main Menu, Toolbar, Timebar. |
|
D |
Track overview |
The track overview shows the complete project (all tracks, end-to-end). Clips may be imported with drag & drop from the clipboard, and moved within the track overview. |
|
E |
Contains lists of all audio or other objects to be worked on. |
|
|
F |
Track buttons & vertical zoom |
Each track has its special buttons, depending on the selected mode, with its track-applicable functions (see below).
|
|
G |
Shows main faders and VU meters. |
|
|
H |
Shows items to control audio playback, recording, etc. |
|
|
I |
Offers many different tools to work on the audio timeline |
|
|
J |
Screen selection tabs |
Allows to change the current editor screen; the current screen is highlighted |
Toolbar
The Toolbar shows the applicable commands:

For explanations on the tools see section Toolbar in page Main Menu, Toolbar, Timebar.
Track Overview
The track overview is a representation of the whole project over all tracks, end-to-end, and the scrollbar.
It is switched on by the show/hide Toolbar button 

All objects of the actual project are shown. Audio objects may be imported/dragged into this overview, be selected and moved.
-
The highlighted area (between 2 vertical light lines) represents the cut area in the timeline, either between in and out markers or for a selected audio object.
-
The vertical double red line shows the actual soundhead position.
-
Marked audio objects are identified by white borders.
Display Bar
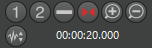
The display bar displays several resolution buttons, the scrollbar for waveforms and various waveform data, like resolution, soundhead position and markers.

With the display bar you can arrange all tracks' display according to your needs.
|
|
The Resolution buttons are for setting the waveform resolution |
|
|
Pressing the buttons 1 or 2 sets the project's default zoom level. |
|
|
Pressing the 3rd button shows the length of the total project. |
|
|
The 4th button zooms in to the selected area |
|
|
The buttons +/- zoom in/out by doubling/halving the displayed area |
|
|
This button activates/deactivates the waveform offset. |
|
|
The time field shows the time length of the currently displayed tracks. It also allows you to enter a specific time length in order to limit the scope of tracks displayed. |
|
Scrollbar |
The scrollbar shifts the soundhead quickly and easily to any project position. With elements in the scrollbar, also rather remote positions in a take may be reached |
|
Start position |
Shows the position at the start of the waveform window. |
|
In and out marker |
Shows the position of in and out markers. |
|
Soundhead position |
Shows the soundhead position (red vertical bars). |
|
End position |
Shows the position at the end of the waveform window. |
|
Time display |
Time overview for the actual session in the waveform. |
|
Sync points' position |
Shows various sync points' positions. |
|
Nearby marker positions |
Shows markers close to the soundhead, with track number, take name and marker type. |


The Track Section
Depending on the selected view, the track head area has different functional buttons, which are only available in this view.
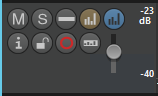
The track head has function buttons and a vertical zoom control.
Clicking the track head highlights it and the track is selected.
Several tracks may be selected, as per Windows standard:
SHIFT+click selects multiple tracks, while CTRL+click un-/selects one track.
In this way, commands may be executed for several tracks (for example, cut selected areas); non selected tracks remain unchanged.
|
Track head button |
Function |
|---|---|
|
|
Mute Button Mutes the track, it will not be replayed. |
|
|
Solo Button Switches the track to solo, so that only this track will be replayed. This also works with a double click on the select area (the lower area of the audio object, which holds its name). |
|
|
Minimized View Switches to minimized view.
|
|
|
Block display Switches to block view mode of the selected track.
|
|
|
Edit display Switches to edit view of the selected track, then shows the vertical zoom control (slider) and the Copy to edit button (s. below).
|
|
|
Track Info ... shows the information for that track. For more details, please see Working steps - MultiTrack screen - Block Display |
|
|
Lock track This button locks/unlocks a track. After locking, the track may not be edited. The background of a blocked track appears grey. |
|
|
Select track for recording |
|
|
Copy to edit A copy of this track will be transferred to the SingleTrack screen. There it may be edited and copied back to the MultiTrack screen. |
|
|
Switch Volume scale type Right click the scaling display to switch between dB and linear (%) view. |


In block and in edit view all tracks are variable in their height; “grabbing” the lower border of a track with the left mouse button enables de-/magnifying of that track. If the CTRL key is held, then the change of height will be applied to all tracks.