Contents of this Page
Overview
On the top of Audio Editors' window there's the main menu, below it the toolbar (which can be moved to another window border).

The timebar can appear also this area (as well movable).

Main Menu
The main menu is the standard menu on top of the Audio Editors' application window. In this documentation we call it always main menu to distinguish from context menus (also called popup menus), which can appear when right-clicking on different items.
By clicking on an item of the main menu its sub menu is opened.

Sub menu options for which a keyboard accelerator is configured show this accelerator key on the right.
Menu items with its title ending with three dots (...) indicate a user interaction will be prompted after selecting it.
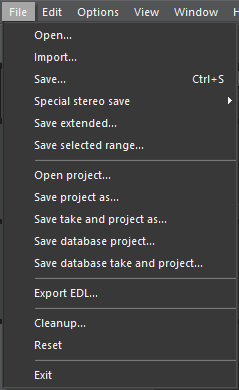
Sub Menu File
|
Item |
Description |
|---|---|
|
Open... |
Open a media file from file system or DigaSystem and add it to the clipboard. If the DigaSystem Database Manager is running, it is brought into the foreground. Otherwise a file selection dialog appears. |
|
Import... |
Open a media file from file system and add it to the clipboard . |
|
Save... |
Renders and saves the current timeline to an audio file or to DigaSystem. If the DigaSystem Database Manager is running, the user is prompted to select a target table; then the Database Manager's entry mask appears to edit meta data. |
|
Special stereo save (depending on specific configuration) |
Renders the current timeline to a new take object in the clipboard (to create new stereo split items from clipboard objects, see Clipboard Stereo Split). Offers these options:
|
|
Save extended... |
Renders and saves the current timeline to an audio file or to DigaSystem. Additional options to configure audio format, meta data and time stretching are offered in a dialog. |
|
Save selected range... |
Renders the selected time range of the current timeline and saves it to an audio file or to DigaSystem (see Save... above). Note there's another function Save selected range to clipboard, which can be reached via the All tracks context menu in MTS. |
|
Open project... |
Opens a project from file system. |
|
Save project as... |
Saves the current project to the file system. A dialog appears which allows you to select the screens whose timeline is to be saved and to select which clipboard objects should be saved. |
|
Save take and project as... |
First saves the current project (see Save project As... above), then renders and saves the current timeline (see Save... above). |
|
Save database project... |
Saves the current project (see Save project As... above) to a DigaSystem table. You are prompted to select a destination table, then Database Manager opens with its entry mask. |
|
Save database take and project... |
Saves the current project to DigaSystem (see Save database project... above), then renders and saves the current timeline to DigaSystem (see Save... above). |
|
Saves the edit decision list to an XML file. A dialog appears prompting for the target file name and directory. |
|
|
Cleanup... |
Shows temporary files created by the Audio Editor in this and past sessions. In the appearing dialog the user can pre-listen audio, drag it to the clipboard or select it for deletion. |
|
Reset |
Clears the timeline of all screens and the clipboard. If there is unsaved data the user is warned and can cancel. |
|
Exit |
After a confirmation request the program is closed. |
Sub Menu Edit
The sub menu Edit differs depending on the current editor screen. See Sub Menu Edit.
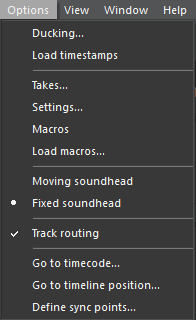
Sub Menu Options
|
Item |
Description |
|---|---|
|
Ducking...
|
Opens the Ducking dialog. |
|
Load timestamps
Load timestamps (DigaStudio), Load Timestamps (file)
|
Load timestamps. |
|
Takes... |
Opens a dialog with information about all takes in the clipboard pane. |
|
Settings... |
Opens the Settings dialog. |
|
Moving soundhead |
Sets the soundhead to moving mode (for the current screen). |
|
Fixed soundhead |
Sets the soundhead to fixed mode (for the current screen). |
|
Track routing
|
Enables or disables track routing, which allows playout synchronously on multiple channel pairs. |
|
Go to timecode...
|
Set soundhead directly to a specified timecode position (meaning the time of day). |
|
Go to timeline position...
|
Set soundhead directly to a specified timeline position. |
|
Define sync points...
|
Opens the Define Sync Points dialog. |
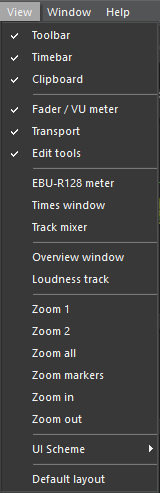
Sub Menu View
|
Item |
Description |
|---|---|
|
Toolbar |
Show/hide toolbar (see below) |
|
Timebar |
Show/hide timebar (see below) |
|
Clipboard |
Show/hide Clipboard pane |
|
Fader / VU meter |
Show/hide Fader / VU Meter pane |
|
Transport |
Show/hide Transport pane |
|
Edit tools (only MTS, STS) |
Show/hide Edit Tools pane |
|
EBU-R128 meter |
Show/hide Loudness Meter pane |
|
Times window |
Show/hide Times window |
|
Speech to text
|
Show/hide Speech to text pane |
|
Track mixer
|
Show/hide Track Mixer pane |
|
Overview window
|
Show/hide Overview track |
|
Loudness track
|
Show/hide Loudness track |
|
Zoom 1
|
Zoom timeline to configured zoom level 1 |
|
Zoom 2
|
Zoom timeline to configured zoom level 2 |
|
Zoom all
|
Zoom timeline to see the whole timeline |
|
Zoom markers
|
Zoom timeline to see the whole time range selection |
|
Zoom in
|
Zoom timeline in one step |
|
Zoom out
|
Zoom timeline out one step |
|
UI Scheme |
Choose between different UI schemes provided. This option is effective only after a restart of the program. |
|
Default layout |
Restores a prepared default layout for the current screen. This includes visibility and arrangement of the whole window, all toolbars and panes. |
Sub Menu Window
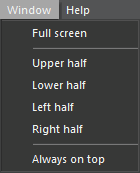
All these options apply to the whole program window, but only for the current screen.
|
Item |
Description |
|---|---|
|
Full screen |
Maximizes to full monitor size |
|
Upper half |
Arranges to the upper half of the monitor |
|
Lower half |
Arranges to the lower half of the monitor |
|
Left half |
Arranges to the left half of the monitor |
|
Right half |
Arranges to the right half of the monitor |
|
Always on top |
Sets the Editor window to "Always on top" mode, so other programs appear behind it, even if active. This option is screen-independent. |
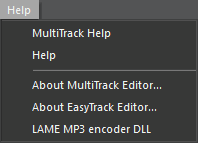
Sub Menu Help
|
Item |
Description |
|---|---|
|
MultiTrack Help
|
Shows the locally installed help. |
|
Help |
Opens the DAVID Learn Platform website for Audio Editors. |
|
About MultiTrack Editor...
|
Opens the program's About box displaying information about program, components and versions. |
|
LAME MP3 encoder DLL |
Shows information about used LAME MP3 encoder. |
Toolbar

|
Item |
Description |
|---|---|
|
File open |
See Sub Menu - File - Open... |
|
File save |
See Sub Menu - File - Save... Items from the Clipboard pane can be dragged and dropped onto this button to save them independently from the timeline. |
|
Undo |
See Sub Menu - Edit - Undo By clicking on the little arrow the complete undo list appears and allows doing several undo steps at once by clicking there. |
|
Redo |
See Sub Menu - Edit - Redo By clicking on the little arrow the complete redo list appears and allows doing several undo steps at once by clicking there. |
|
Zoom in |
Zoom timeline in one step |
|
Zoom out |
Zoom timeline out one step |
|
Remove gap at start |
Removes gap at start of timeline (where no objects are on all tracks). |
|
Build group
|
Builds a group of all selected objects |
|
Separate group
|
Separates objects of a selected group |
|
Show overview window
|
Show/hide Overview track |
|
Show track mixer
|
Show/hide Track Mixer pane |
|
Show loudness track
|
Show/hide Loudness track |
|
Drop mode |
Select one of the drop modes |
Timebar
The timebar appears usually in the area next to the toolbar, but is movable and can be docked to another window border. It shows six different time information. The arrangement and some parameters of them are configurable by the administrator or by right-clicking one of them:

The time window shows the same data (using the same configuration), but is more flexible in positioning and sizing. It can be called in the menu View → Times window. It behaves like an own GUI section and can be embedded anywhere in the editor:

For setting time Information fields, right click the desired time information field in the timebar. This opens a dialog box:
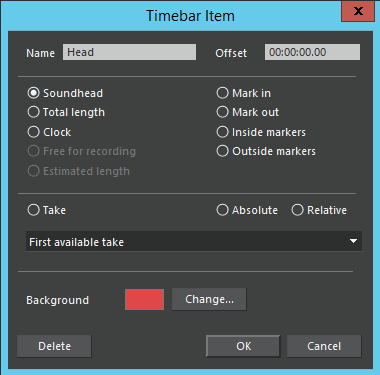
Now you can select one of the available points:
|
Name |
Defaulted, but freely selectable |
|
|
Offset |
The actual value may be de- or increased, for example for the actual New York time minus 6 hours. |
|
|
Soundhead |
Soundhead position |
|
|
Total length |
Total project length, i.e. all tracks |
|
|
Clock |
Actual wall-clock time |
|
|
Free for recording |
Total hard disk storage capacity |
|
|
Estimated length |
Calculated total production length (audio and text, based on selected speed of speech) in the ReporterBox |
|
|
Mark in |
Position of the in marker |
|
|
Mark out |
Position of the out marker |
|
|
Inside markers |
Length of the selected area |
|
|
Outside markers |
Length outside of the selected area |
|
|
Take Absolut |
Soundhead position of the selected take in real-time value |
|
|
Take Relative |
Soundhead position of the selected take, relative to the length |
|