Editing Entry Metadata
Entries and their contents are the main entities that you as user of the DBM are dealing with. In order help for smooth workflows within your organization, quite some attention in the DBM is laid on the handling of entries' metadata. In this chapter you will be guided step by step, how the informations about entries - the metadata - can be dealt with. If deeper knowledge is required you will be referred to related sections in the chapter Learn and Explore
Edit an Entry's Title
Database entries can be renamed directly in the table without the need to open the entry:
- Click on an entry to mark it.
- Now click into the field you would like to edit, e.g. the Title. The field can now be edited:

- Confirm the action by pressing the ENTER key.
Entries Text Field Context Menu
With a right-click on the ENTRIES Text field you get following context menu which lets you modify the setup of the text field:
Undo | Undoes the last action performed on this field. |
Cut | Move the marked text into the clipboard. |
Copy | Copies the marked text into the clipboard. |
Paste | Inserts the contents of the clipboard into the text field. |
Delete | Deletes the marked text. |
Select all | Marks the entire field contents. |
An Entry's Context Menu
With a right-click on a selected Entry you get following context menu which lets you modify an entry's metadata or perform same action on the contents.
Edit | Opens the entry's user mask so that changes can be made in the metadata. Equivalent to double-clicking on the entry. |
Delete | Opens the delete dialog box in order to perform a delete operation.  |
Play | Opens the mini-player directly below the selected entry. Equivalent to clicking with the middle mouse button on the entry and to the preview button in the button bar. |
Stop | Stops the preview and closes the mini player module. |
Merge entries | A pure audio entry and a pure text entry are marked and merged to one entry. C.f. section below Merging Entries. |
Deselect | Removes the marking on the selected entry or entries. |
Opens the print template dialog to print out the marked entries.  | |
Paste from clipboard | The text stored in the clipboard is inserted at the current cursor position. |
Get entry | The selected virtual entry is transferred via the next available line from a DigaSystem®connected via DigaReplicator, as soon as the virtual entry has been filled with audio. |
Send to… | Send the chosen entry/ies to a predefined selection of applications. |
Export | Exports the entry to a directory to be defined in a windows box. |
Convert audio | Opens the conversion dialog to convert the audio format. |
Copy to clipboard | The marked text is copied into the clipboard. |
Archive | Archives the selected entry. Equivalent to using drag&drop onto the Archive symbol. Works only on Archive workstations.  |
Zip entry | Create a zip file of the selected entry (required to copy DigaCutMT/ST projects to another table) |
Unzip entry | Open a zipped table entry and create a normal table entry out of it (see above) |
DigaText OnAIR TrackMixer SingleTrack EasyTrack MultiTrack DigaIngester DigAIRange DigaClipboard Sequoia | Transfers the selected entry into the appropriate module. Equivalent to using drag-and-drop to transfer the entry to the symbol within the button bar or to selecting a module from the Entry mask after pressing the Edit button in its Dialog area. You get the Entry mask by double clicking on an entry. |
Viewing and Editing Entry Metadata
Columns in the ENTRIES area show important metadata in order to help you find the desired entry. To view an extensive list of entry metadata simply double click an entry or select it and - with the right mouse button - choose the Edit menu. You or your administrator - if you don't have the access rights - can configure the order and metadata displayed in the metadata mask to fit your needs.

In order to get all possible tabs displayed you do a Ctrl+Shift+A inside a Metadata mask. This way you have access to all possible metadata fields.
All tabs are described in the Learn and Explore section Tabs of the Entry Metadata Mask. Here is the complete list of Tabs:
Dialog Buttons
On the right side of the Entry Metadata Mask you find several Dialog buttons
| Button | Description |
|---|---|
| OK | Save the database record with all changes. |
| Cancel | Close the edit screen without saving any changes. |
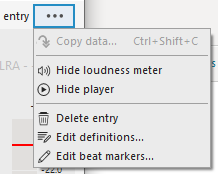
| ... | Opens a menu with additional operations. Entries in the database fields can be added, changed, or deleted. |
| Copy data: Opens the "Copy Data" dialog which allows to copy metadata from another entry. | |
| Show/Hide loudness meter: Shows or hides the EBU-128 loudness meter. | |
| Show/Hide player: Shows or hides the audio player portion of the metadata mask. | |
Delete Entry: The entry is soft deleted (can be restored). | |
Edit definitions: Opens the Edit Definitions Dialog. | |
Edit beat markers: Shows all beat markers set by a DigaSystem audio editor. | |
| Link virtual entry | This button allows you to take over meta data into another media entry. Please see Link Media Entry with Virtual Entry Note: An administrator can reconfigure this button to execute one of the functions in the "..." menu via |DBM|MetadataMaskAction |
| Edit | Opens a list of possible DigaSystem modules. Via this dialog the entry can be loaded into another module to be further processed (e.g. audio editors). |
| Using this button during recording allows for the setting of marks at the current recording head position which are then stored with the entry. These are later transferred to the Edit Station and displayed in the sequence block. However, it is not possible to assign marks to an entry which has already been saved since opening the entry's edit screen allows only the database record to be modified and not the audio file. If marks are inserted immediately before the transfer to the Edit Station then these are however transferred to the Edit Station. |
| By clicking with the middle mouse button on a mark in the player deletes this mark. This also only works in recording mode or immediately prior to transferring the entry to an editor, and not when an entry which has already been saved is saved after the deletion of marks |
| Deletes all marks. This also only works in recording mode or immediately prior to transferring the entry to an editor, and not when an entry which has already been saved is saved after the deletion of marks. |
| Save the data, then open the previous or next listed database entry. Note: If you don't have write rights for the current table, indicated by the label "Read only" in the dialog's title bar, the previous/next buttons do not save any data, and only open the previous/next entry. |
| The buttons in the lower left corner let you open the entry directly in an application. Available buttons depend on the configuration. |


Recorder/Audio Player
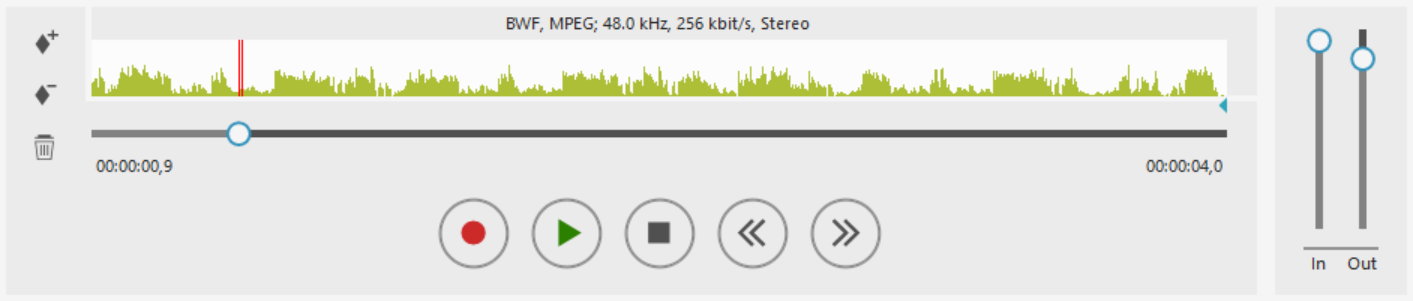
| Start/Stop Recorder |
| Playback: Starts playback |
| Pause: Stops the playback |
| Rewind/Fast Forward Playback speed is increased, decreased or reverted. The sound does not pitch. |
Soundhead  | The numeric value below the left end of the timeline displays the timecode position of the sound head. |
Length  | The numeric value below the right end of the timeline displays the duration of the media file. |
 | This text above the waveform display contains the audio and file format. |
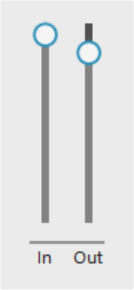
| Volume Fader: |


The recorder displays a rectangular red frame to indicate recording state:
- After pressing the REC button, the frame flashes to idicate the "armed" state when the input line is active, the VU meter displays the input level, but no data is actually recorded.
- When, in armed state, you press START, and the recording starts, the frame becomes solid to indicate that data is being recorded.
- When you finish recording, the frame is no longer visible.